
This post may contain affiliate links. Read my Disclosure page.
This No-Bake Butterfinger® Pie is an absolute must-make! It's super creamy, tasty, peanut buttery and entirely no-bake!
This post is sponsored by Butterfinger®. All opinions are 100% my own. Thanks for continuing to support the brands that help make ‘Mike Bakes NYC’ possible!
Table of contents
No-Bake Butterfinger® Pie
I know that no-bake desserts tend to be more popular during the summer months, but I actually love to make them year-round. One time of year that I love having no-bake pie recipes on hand is during the holidays. Because let’s be real, your oven is already working overtime this time of year. Am I right?! That's why I partnered with my friends over at Butterfinger® to bring you this delicious No-Bake Butterfinger® Pie.
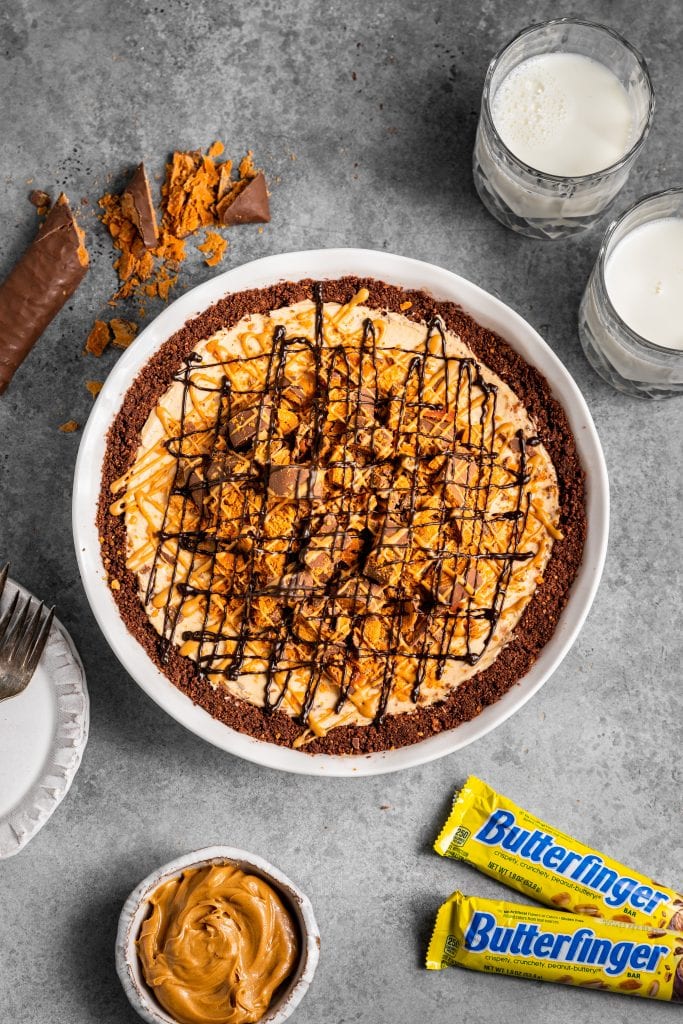
This no-bake pie comes together so easily; the filling is a delicious combo of peanut butter, cream cheese, and whipped cream and there are crushed Butterfinger® bars both in the filling and sprinkled on top! You can find Butterfinger® in your local grocery store! (Here’s a nifty little store locator tool!)

Ingredients for No-Bake Butterfinger® Pie
To make this homemade No-Bake Butterfinger Pie recipe, you will need the following ingredients:
- Graham Crackers + Cocoa Powder: You can simply use chocolate graham crackers and eliminate the need for cocoa powder, however, they can be tricky to track down so this is a nice alternative!
- Butter: The one and only. I mean, we gotta hold that chocolate graham cracker crust together somehow!
- Brown Sugar: Either light or dark will work here!
- Heavy Cream: Make sure your cream is as cold as possible as it'll make it easier to whip it into whipped cream.
- Powdered Sugar: Used to sweeten the whipped cream slightly as well as the pie filling.
- Peanut Butter + Cream Cheese: Used to give this no-bake pie the most perfect flavor and texture.
- Vanilla: A nice little flavor enhancer.
- Butterfinger® bars: This is a Butterfinger® pie, after all. I used 5 full-size bars (2 in the filling, 3 for the topping) for the ultimate crispety, crunchety, peanut-buttery taste.
- Peanut Butter + Cocoa Powder: Used for drizzling the top of the pie and totally optional!

How to Make No-Bake Butterfinger® Pie
I adore easy desserts, and this is one that deserves to be made over and over again.
You'll start with making the chocolate graham cracker crust by whisking together the graham cracker crumbs, cocoa powder, and brown sugar. Then, you'll stir in the melted butter and press into your greased pie plate. From there, you can either choose to bake the crust for 10 minutes at 350°F (180°C) or you can simply allow it to chill in the fridge for a true no-bake experience.

Next you'll make the filling; you'll start by whipping the heavy cream and a bit of powdered sugar together to stiff peaks. Once that's done, you'll beat together the peanut butter, cream cheese, and remaining powdered sugar until well combined.
Then comes the fun part, chopping the Butterfinger bars. I went with a rough chop so the pie would have a few larger chunks of Butterfinger® in it. Once your Butterfinger® is chopped up, you'll fold together the whipped cream and peanut butter/cream cheese mixture and then incorporate the Butterfinger®. Then pour the mixture into the pie plate (if you baked your crust, make sure it's sufficiently cooled off), smooth the top, and place in the refrigerator or freezer to chill. If chilling in the fridge, I recommend at least 5-6 hours or preferably overnight; if using the freezer, it'll only take about 2 hours. Once it's chilled a bit, you can add all the chopped Butterfinger® and melted peanut butter drizzles you want.

No-Bake Butterfinger® Pie Recipe Troubleshooting & FAQ
CAN I USE A STORE-BOUGHT GRAHAM CRACKER CRUST INSTEAD?
Absolutely; no need to change the ingredient amounts in the filling!
CAN I USE COOL WHIP IN THE FILLING INSTEAD OF HEAVY CREAM?
I would avoid using cool whip and just whip the heavy cream to stiff peaks instead; trust me!
HOW LONG WILL THE PIE LAST IN THE FRIDGE?
You mean you have LEFTOVERS? Oh my goodness! (Just kidding!!) It should last about 3 days.
CAN I FREEZE THIS PIE?
Actually, yes! This pie can be frozen for up to 1 month. Feel free to serve straight from the freezer or allow it to thaw overnight in the fridge before serving.
HELP! MY FILLING LOOKS SEPARATED. WHAT DID I DO WRONG?
Sounds like it might be a problem with your peanut butter! I recommend using a non-natural peanut butter; the natural style/oily peanut butters that require stirring can cause the filling to separate and turn greasy which no one wants.

Whether you're looking for a new holiday pie staple or just looking for a delicious, easy recipe... this No-Bake Butterfinger® Pie is the perfect treat! Trust me!

No-Bake Butterfinger® Pie
Ingredients
For the Crust:
- 150 g graham cracker crumbs (about 10 full-sheet graham crackers)
- 20 g cocoa powder
- 55 g light brown sugar
- 70 g unsalted butter melted
For the Filling:
- 240 g heavy cream chilled
- 120 g powdered sugar divided
- 225 g cream cheese softened
- 250 g creamy peanut butter
- 1 teaspoon vanilla extract
- 115 g BUTTERFINGER® Bars (2 full-sized bars)
For the Toppings:
- 170 g BUTTERFINGER® Bars (3 full-sized bars)
- creamy peanut butter melted
- creamy peanut butter + 1 tablespoon cocoa powder melted
Instructions
- Spray a 9-inch pie dish with nonstick spray or grease lightly with butter. If opting to bake your pie crust, preheat the oven to 350°F (180°C).
- In a medium bowl, whisk together the graham cracker crumbs, cocoa powder, and light brown sugar. Stir in the melted butter, then press into the pie dish. Either chill the pie crust in the freezer until needed or bake for 9-10 minutes and allow to cool as you prepare the filling. (I prefer to bake the pie crust as I find it makes the crust slightly less crumbly when slicing the finished pie.)
- Using a hand mixer or a stand mixer fitted with the whisk attachment, beat the heavy cream and 30 grams (¼ cup) of the powdered sugar on medium-high speed until stiff peaks form, about 4-5 minutes. Spoon the whipped cream into a small bowl and set aside. Using the same mixing bowl (no need to clean!), beat the cream cheese, peanut butter, vanilla, and remaining powdered sugar together on medium-high speed until well combined. The mixture will be thick. Fold in the chopped Butterfinger® bars and whipped cream until smooth and combined. Be careful so you do not deflate the cream.
- Pour the filling into the prepared pie shell and freeze for 3 hours or chill in the fridge at least 5 hours or overnight.
- Once thoroughly chilled, top with chopped Butterfinger® bars and drizzle with melted peanut butter. Serve frozen or refrigerated.
Notes
Nutrition
MikeBakesNYC LLC owns the copyright on all images and text and does not allow for its original recipes and pictures to be reproduced anywhere other than at this website unless authorization is given. If you enjoyed the recipe and would like to publish it on your site, please re-write it in your own words, and link back to my site and recipe page. Read my Disclosure page. This post may contain affiliate links.
Rate this Recipe + Leave a Review